Sunday, October 4, 2009

VMware - Convert between growable and preallocated (*.vmdk)

A VMDK file can be converted into another formate while no VM is using it. The operation will copy the old disk into a new one.

vmware-vdiskmanager -r <source-disk> -t <type> <target-disk>

Disk type can be one of:

0                 : single growable virtual disk
1                 : growable virtual disk split in 2Gb files
2                 : preallocated virtual disk
3                 : preallocated virtual disk split in 2Gb files

VMware - Grow an existing virtual disk (*.vmdk)

A VMDK file can be grown while no virtual machine is using it. Growng the VMDK only makes the virtual harddrive bigger - filesystem within the VMDK must still be grown with other methods (for instance on Windows, diskpart).

On ESX:
vmkfstools -X <newsize>G filename.vmdk

On ESX 3.5, you can also edit the VM settings and edit the harddrive when the VM is not running.

Note that on ESX the filename.vmdk file is just a  file containing metainformation and "filename-flat.vmdk" is the actual data file. However, vmkfstools operations are used on the metafile

On VMware Server Workstation and VMware Fusion:

vmware-vdiskmanager -x Gb filename.vmdk

For instance, if growing an existing vmdk file named "server1.vmdk" and it is to be grown so it's new size is 20GB, the command would be:

On ESX:

vmkfstools -X 20GB server1.vmdk

On Server/Workstation/Fusion

vmware-vdiskmanager -x 20Gb server1.vmdk

On Fusion vmware-vdiskmanager is located by default at /Library/Application Support/VMware Fusion/vmware-vdiskmanager

VMware Performance Tuning - Linux Guest

Linux guests' performance may be improved if they have been created without much thought.
  • Always use a single VCPU when the CPU capacity requirement of the VM allows it.
  • Install VMware Tools and keep it updated.
  • Add the options "nosmp noapic nolapic clock=pit" to the guest's kernel (2.6) parameters. Don't add "nosmp" if using more than one VCPU.Note clock=pit is depracted since kernel 2.6.16. Use clocksource=pit instead if your kernel is newer than that.
  • On RHEL 5.1 (and variants such as CentOS 5.1) add the option divider=10 to the kernel boot parameters. This causes the default clock tick rate, 1000HZ to be divided by 10, so HZ=100. On other distros, try using a kernel with Hz=100. Most 2.6 desktop distros are using HZ=1000, while the server distros tend to use HZ=100 or HZ=250.

In-Memory Temp Drive

In the host's /tmp directory create a new directory  (e.g. /tmp/vmware). This will be used as the mount point for a tmpfs (in-memory) partition for storing VM related, temporary files.

Edit /etc/fstab and add the /tmp/vmware partition to your list of mount points:

tmpfs /tmp/vmware tmpfs defaults,size=100% 0 0

Now if you execute the following command the tmpfs filesystem will be mounted at /tmp/vmware:

sudo mount /tmp/vmware

If successful, reboot the server to ensure the tmpfs partition is mounted at boot time.

VMware Performance Tuning

While in search of tuning information for VMware, I came across much of the following information and have found it to be extremely beneficial.

Windows Configuration

Windows VM:
1024MB Ram 10GB SCSI disk, 1 Ethernet device, USB

It's recommended by VMWare that Windows VMs be configured to use IDE, however in my reading,  the Virtual IDE devices use tons more CPU time than the SCSI device. This is due to the emulation level done and lack of I/O threading in VMWare's IDE controller. I have to assume that this is a problem with IDE in general, as it's never been very good at multithreaded I/O (this is one big reason it's never been used for servers). Additionally,it is recommended to use the LSILogic controller. It supports multithreaded IO while the Buslogic controller doesn't.

Print Server Setup
Printing to a USB printer directly connected to the VMWare server.  Ubuntu doesn't configure USBFS out of the box. This can be corrected by editing a few files:

Add to fstab:
usbfs /proc/bus/usb usbfs auto 0 0

Edit /etc/init.d/mountdevsubfs.sh, and uncomment the following lines:

#mkdir -p /dev/bus/usb/.usbfs
#domount usbfs "" /dev/bus/usb/.usbfs -obusmode=0700,devmode=0600,listmode=0644
#ln -s .usbfs/devices /dev/bus/usb/devices
#mount --rbind /dev/bus/usb /proc/bus/usb


This is done by removing the # from the front of each line. Once this is done, go ahead and run the script.

/etc/init.d/mountdevsubfs.sh start

In the Virtual Machine configuration, to ensure that the printer was always connected on startup, insert the following configuration into that Virtual Machine's VMX file:

usb.present = "TRUE"
usb.generic.autoconnect = "FALSE"
usb.autoConnect.device0 = "0x0000:x0000"
usb.autoConnect.device1 = "0x04e8:0x327e"
usb.generic.skipsetconfig = "TRUE"


You can get the IDs for your devices by issuing an lsusb on the VMWare Server, this command will output similar to the following:

Bus 002 Device 002: ID 04e8:327e Samsung Electronics Co., Ltd
Bus 002 Device 001: ID 0000:0000
Bus 001 Device 001: ID 0000:0000


Additionally, I blacklisted usblp on the VMWare Server so the host didn't connect to the printer making it unavailable to the guest.

echo "blacklist usblp" >>/etc/modprobe.d/blacklist

Printing now "just works" after rebooting. Of course for it to "just work" you also need to configure CUPS or Windows printer shareing, but that is out of the scope of this article.

Add each of these to /etc/vmware/config:

mainMem.useNamedFile tells VMWare where to put it's temporary workspace file. This file contains the content of the Virtual Machine memory which is not used. By default it is placed in the directory with the virtual machine, however that can seriously impact performance so we'll turn it off.

mainMem.useNamedFile = FALSE

tmpDirectory is the default path for any temp files. We need to change that to be a shared memory filesystem (in RAM).

tmpDirectory="/dev/shm"

prefvmx.useRecommendedLockedMemSize and prefvmx.minVmMemPct tell VMWare to either use a fixed sized memory chunk or balloon and shrink memory as needed. Since I have 8GB of memory in this server I want to make sure that I use a fixed chunk of memory to reduce disk IO.

prefvmx.useRecommendedLockedMemSize="TRUE"
prefvmx.minVmMemPct="100"


To tune each Virtual Machine, I installed VMWare tools and then made the following changes to each VMX file:

Set the time in the Virtual Machine to the hosts time (I use NTP on the host):

tools.syncTime = "TRUE"

When I reboot the host, I want to gracefully stop each VM instead of just powering it off:

autostop = "softpoweroff"

This tells the VM to not share which saves CPU cycles:

mem.ShareScanTotal=0
mem.ShareScanVM=0
mem.ShareScanThreshold=4096
sched.mem.maxmemctl=0
sched.mem.pshare.enable = "FALSE"


This basically performs the same action as the configuration I put in /etc/vmware/config by telling the VM to eliminate the temp files and not to balooning and shrink memory, however it doesn't hurt anything to have it in both locations:

mainMem.useNamedFile = "FALSE"
MemTrimRate = "0"
MemAllowAutoScaleDown = "FALSE"


In order for the VMWare configuration to work properly with shared memory, you'll need to increase the default shared memory size for tmpfs to match the amount of memory in your system. This can be done by editing /etc/default/tmpfs:

SHM_SIZE=5G

You can use 'mount -o remount /dev/shm' and 'df -h' to implement and verify the change.

Or if needed...Create an in-memory temp drive

Configure /etc/sysctl.conf on the VMWare Server which configures the kernel to perform better as a Virtual Server by inserting the following configuration:

vm.swappiness = 0
vm.overcommit_memory = 1
vm.dirty_background_ratio = 5
vm.dirty_ratio = 10
vm.dirty_expire_centisecs = 1000
dev.rtc.max-user-freq = 1024


Lastly, I disable the tickless kernel option in kernel 2.6.26 which further reduces the Virtual Machine I/O constraints by reverting back to using ticks which is better supported by VMWare. This can be done by adding the following option to the kernel options line in /boot/grub/menu.lst or /etc/lilo.conf:

nohz=off

Example:   
kernel   /vmlinuz-2.6.26-1-686-bigmem root=/dev/sda3 ro quiet hdb=noprobe nohz=off

Saturday, October 3, 2009

SuperMirco | Raid | Debian Installation

This is really quite simple but took me quite awhile to figure out.
Basically from all my reading, most on-board raid controllers are
really not Hardware Raid. A more accurate description or definition
would be a software raid controlled by a BIOS. I sort of knew this
already, but it certainly is frustrating to get one working properly. It is
especially frustrating that some "server" grade hardware uses a software
(fake raid) instead of building in a true hardware raid solution.

So the scoop...There is a function that I had forgotten about. When
you get the first splash screen to install Debian (has several options
ie. expert install, graphical install, expert graphical install etc.),
do not press enter to proceed. Press the "tab" key and you
will get a print out of the actual install/boot parameters. You
simply add to the end of this line,

dmraid=true

Presto. It recognizes the mirror setup that I had done in
the Adaptec configuration. I did not try this on the Intel
controller setting, but expect it would work as well.

Additional note...software raid is a bugger to do under Debian. However, I was well on my way to completing it when I figured this out. The slickthing about it though is that you can take any system that can support 2drives and mirror them at any time. I know that is an obvious statement, but if you come across a system that needs to be mirrored and didn't want to start from scratch, you simply install a drive ofthe same size and an hour later it is mirrored.

PXE Boot | OpenBSD | Soekris

SET UP A PXE BOOT SERVER ON THE NETWORK
  • Install OpenBSD on a box with more than one network interface. Set the server up on the network with the primary interface active and configured to talk on the network.
  • Configure the 2nd interface on a private subnet for dhcp and tftp use by the new PXE box.

SET UP ACCESS TO THE BOOT SERVER
  • edit /etc/sysctl.conf /etc/rc.conf and enable packet filtering and forwarding
  • edit pf.conf to resemble the following simple, limited access structure
ext_if="sis0"
int_if="sis1"
set skip on lo
scrub in all
nat on $ext_if from !($ext_if) -> ($ext_if:0)
block in
pass out
pass quick on $int_if no state
pass in quick on $ext_if proto tcp from 159.212.48.138 to ($ext_if) port ssh
antispoof quick for { lo $int_if }


GET THE PXE FILES
  • This box needs to download or acquire the latest PXE boot files from the OpenBSD project.
  • If you need to go through a proxy, you should set env variable like following example.
export http_proxy="http://proxy.blah.com:8080"
  • You can check this with the env command.
  • Then use wget specifying the --proxy-user=username and --proxy-password=password as needed. An example follows:
wget --proxy-user=someuser --proxy-password=p4ssw0rd http://openbsd.mirrors.hoobly.com/4.3/i386/pxeboot
  • You will also need to get the ramdisk kernel bsd.rd
  • The Files can also be transfered from another server where they were downloaded. scp is recommended.

SET UP DHCP TO BOOT THE PXE BOX
  • add something like the following to your dhcp.conf file, note the filename "pxeboot"; directive - this should be set to the name of your PXE boot file.

shared-network LOCAL-NET {
option domain-name "boot.net";
option domain-name-servers 159.212.72.72, 159.212.99.99;

subnet 10.0.10.0 netmask 255.255.255.0 {
option routers 10.0.10.1;
filename "pxeboot";
range 10.0.10.100 10.0.10 150;
default-lease-time 3600;
max-lease-time 10800;
}
}

  • make sure to set your hostname.* file for the 2nd interface to the corresponding IP address of the option routers setting, in this example 10.0.10.1
  • add the name of your 2nd interface to the dhcp.interfaces file
  • start dhcpd manually with the following (user your own device name)
dhcpd sis1
  • check for dhcpd running with
ps aux | grep dhcpd
  • if it's not running, check for errors with
cat /var/log/messages | grep -i dhcp


SET UP TFTP TO SERVE THE FILES
  • uncomment (remove the #) the line in /etc/inetd.conf as follows:
#tftp dgram udp wait root /usr/libexec/tftpd tftpd -s /tftpboot
  • create the directory in the above line /tftpboot
  • place the pxeboot and bsd.rd files in the /tftpboot directory
  • you may want to create an etc subdir and put a boot.conf file in it.
  • sample /tftpboot/etc/boot.conf for a soekris install would looke like this:
stty com0 19200
set tty com0
  • either use a line in the boot.conf to specify the bsd.rd or rename the file bsd.rd to simply bsd
  • restart inetd (not sure if this is needed, but I did it)
pkill inetd
inetd

SOEKRIS INSTALL
  • Plug a crossover cable in to the 2nd interface of your INSTALL SERVER and the primary interface of the server you wish to install on.
  • Boot the new server and enter the boot BIOS by typing CTL-P on a Soekris box.
  • Give the PXE boot command
boot f0
  • Its a regular OpenBSD install from here.

Soekris - Install Documentation

As per Lin...

One of the most complete (and verbose) sites is the following, and they have a great photo gallery of all sorts of gearhead type activities with the soekris net4801.
http://www.ultradesic.com/index.php?section=22
http://gallery.ultradesic.com/v/Soekris/

Others:
http://www.pingwales.co.uk/2006/05/22/OpenBSD-on-Flash.html (probably my 2nd choice)
http://www.dblab.ece.ntua.gr/~adamo/howto/Soekris/
http://opensoekris.sourceforge.net/
http://www.nmedia.net/~chris/soekris/ (also sounds interesting)

I think there's more than enough resource here to get one pointed in the right direction.

http://soekris.com/ is the manufacturer link, btw.

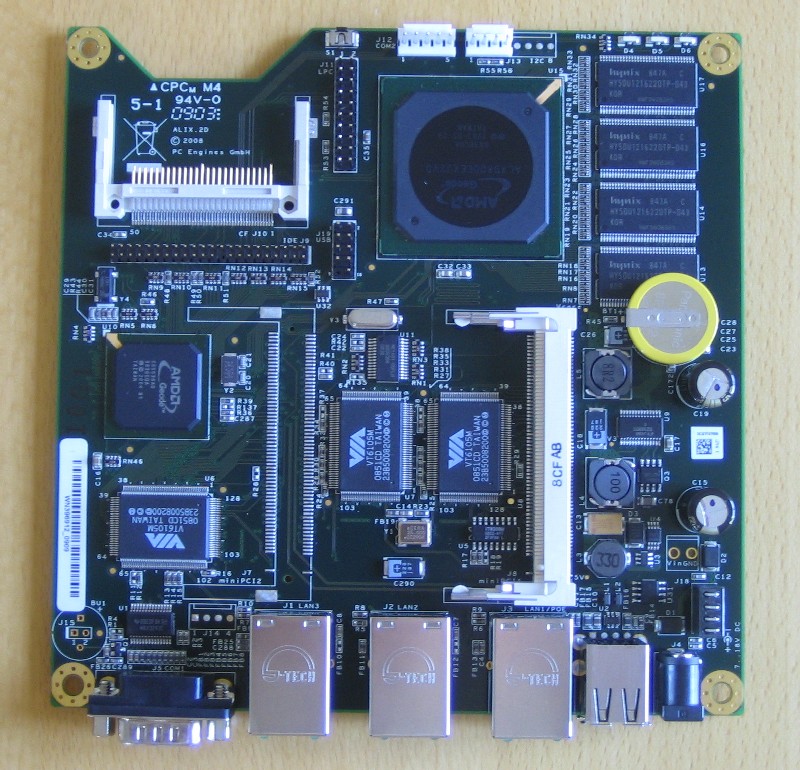
PC Engines Alix2d3

I purchased an Alix2.x series device many months ago as an alternative to the more expensive Soekris 5501 device. These small form factor devices have been ideal for firewall solutions when combined with OpenBSD.

Installation notes to follow.

Features:

• CPU: 500 MHz AMD Geode LX800
• DRAM: 256 MB DDR DRAM
• Storage: CompactFlash socket, 44 pin IDE header
• Power: DC jack or passive POE, min. 7V to max. 20V
• Three front panel LEDs, pushbutton
• Expansion: 1 miniPCI slot, LPC bus
• Connectivity: 3 Ethernet channels (Via VT6105M 10/100)
• I/O: DB9 serial port, dual USB port
• Board size: 6 x 6" (152.4 x 152.4 mm) - same as WRAP.1E
• Firmware: tinyBIOS


Netra T1 Lom Commands

There are three prompts available on the Netra-t1.
ok>   -------------------- (normal prompt when the OS is not running)
lom>  -------------------- (available whether OS is running or not)
#     -------------------- (the OS prompt)

To move between the "ok>" prompt and the "lom>" prompt, type:
ok> #.      There must be less than 1 second between the "#" and "."
lom>        ------>      This is the prompt you get

Root can change this character sequence:
# lomctl 

Only the first character ("#") can be changed. You don't need
to know the previous character to do this.

To find out the current sequence do an "init 5":
# init 5
This shuts down the system and gives you the "lom>" prompt

Then to show the current two-character sequence type:
lom> show escape

To move between the "lom>" prompt and the "ok>" prompt type:
lom> console

See Infodoc 27372 for a flow chart of how to jump around between the "lom>",
"ok>" and "OS" prompts.

Some useful lom> commands are:

lom> poweron ------------- (powers on the netra)
lom> poweroff ------------ (powers off the netra)
lom> reset --------------- (the same as the ok> reset command)
lom> reset -x ------------ (resets the CPU only- externally initiated
reset XIR)
lom> break --------------- (goes to the ok> prompt from the OS- "Stop-a")
lom> environment --------- (current status of all components in system)
lom> check --------------- (updates component status after repairing it-
run "lom> environment" again)
lom> show eventlog ------- (show last 10 events on the system)
lom> set faulton --------- (turns on the fault LED)
lom> set faultoff -------- (turns off the fault LED)
lom> set alarmon [1-3] --- (sets 1 of 3 alarms on)
lom> set alarmoff [1-3] -- (sets 1 of 3 alarms off)
lom> show model ---------- (show the server model)
lom> show hostname ------- (same as uname -n)
lom> show ---------------- (help for the "show" command)
lom> help ---------------- (list of LOM commands)      
You can set the boot mode of a netra using the below "lom>" command:

lom> bootmode [-u][normal|forth|reset_nvram|diag|skip_diag]

-u      allows sharing of the console and LOM device

normal  server boots using the OBP environment settings
-must reset server to take effect

forth   server stops at the "ok>" prompt- same as "Stop-f"
-must reset server to take effect

reset_nvram -"ok> set-defaults" or "Stop-n"
-must reset server to take effect

diag    runs full POST- "ok> diag-switch? true" or "Stop-d"
-must power off server and back on within 10 minutes

skip_diag - ok> setenv diag-switch? false"
-must power off server and back on within 10 minutes


Also see related Infodocs:

27372 How do I jump to LOM prompt on the the Netra T?
26009 Installing the Netra T1 Model AC200 or DC200 from cdrom using
Solaris 8 Update 2 (10/00) or Solaris 8 Update 3 (01/01)
26310 Reinstalling Solaris 8 on the Netra X1 including LOM (Lights
out Management) packages
26667 Connecting a serial cable from a Netra T1 AC/DC200 server to
a laptop

Complete List of Commands

Command
Effect
alarmoff n
Set alarm n off.
(Where n is 1, 2, or 3.) These three alarms are software flags. They are associated with no specific conditions but are available to be set by your own processes.
alarmon n
Set alarm n on.
(Where n is 1, 2, or 3.) These three alarms are software flags. They are associated with no specific conditions but are available to be set by your own processes.
break
Takes the server down to the OK prompt.
bootmode mode
Determines the behavior of the server during the boot process.
check
Resets monitoring to report all failures.
If a monitored component has failed, the LOMlite2 device will not continue to report the same failure. To check the status of the component, for example, after attempting to fix it, issue the check command. This updates the status of all monitored components.
console
The command takes you out of the LOMlite2 shell and back to the Solaris prompt. It returns control of the serial connection to the console.
environment
Displays the temperature of the server and the status of the fans, the power supply, the over-temperature monitors, the supply rails and circuit breakers, the alarms, and the fault LED.
faulton
Sets the Fault LED to On.
faultoff
Sets the Fault LED to Off.
help
Displays the list of LOM commands.
loghistory
Displays all the events in the LOMlite2 device's Event Log.
logout
This command is for use by named users you have set up with password access to the LOMlite2 device. It returns them to the LOM user login prompt.
poweron
Powers the server On.
poweroff
Powers the server Off.
reset
Resets the Netra T1 server.
show model
Displays the server model.
show hostname
Displays the server name (this command is equivalent to the Solaris uname -n command.
show eventlog
Displays the LOMlite2 device's event log.
The event log is the list of the last 10 events to have been stored in the LOMlite2 device. The most recent event is the one at the bottom of the list.
show escape
Displays the current LOMlite2 escape sequence.
show
Displays all the information available with the show command.
useradd
Adds a user to the LOMlite2 device's list of permitted users.
userdel
Deletes a user to the LOMlite2 device's list of permitted users.
usershow user
Displays the details for the LOMlite2 account user.
userpassword
Sets or changes a user's password
userperm
Sets the permission levels for a named user.
version
Displays the version number of the LOMlite2 device.

Pa

OpenBSD - Howto create bootable media (thumb drive)

  1. Boot from CD or start your OpenBSD VM.
  2. At the "Install, Upgrade or Shell" prompt, select the shell.
  3. Insert the pen drive. You will see kernel messages about the insertion, including the virtual SCSI drive # assigned to the drive. For this example, I will use "sd0" but it may be another number.
  4. Put an MBR on the drive, reserve all space as a single MBR partition for OpenBSD:
    # fdisk -iy sd0
  5. Put an OpenBSD disklabel on the drive, assign all available space as a single "a" partition on sd0:
    # disklabel -E sd0
    Use "a a" to add partition a, take the defaults for all prompts, once the partition is created, use the "q" command to exit the disklabel program. Answer "y" to write the disklabel.
  6. Format the "a" partition on sd0 as an OpenBSD FFS partition:
    # newfs sd0a
  7. Mount it:
    # mount /dev/sd0a /mnt
  8. Copy the second stage boot loader and the ramdisk kernel to it:
    # cp /bsd.rd /mnt
    # cp /usr/mdec/boot /mnt
  9. Create an /etc/boot.conf on the drive so you do not have to request the ramdisk kernel manually at boot time:
    # mkdir /mnt/etc
    # echo set image /bsd.rd > /mnt/etc/boot.conf
  10. Install the PBR:
    # /usr/mdec/installboot -v /mnt/boot /usr/mdec/biosboot sd0
  11. Unmount the pen drive:
    # umount /mnt

Friday, October 2, 2009

Screen - Serial Terminal Emulator

Who knew "screen" was so flexible. As per Lin... "You specify the device and the speed (the example is for a Soekris 5501 under linux on the first serial port with the default bios speed of 19200) and it just works. Pretty sweet, and it'll work under OSX with the dongle..."

Linux Example: screen /dev/ttyS0 19200
OS X Example: screen /dev/tty.usbserial 19200