I recently setup an installation of Owncloud on a Debian virtual machine so that my family members could more easily share some holiday pictures. Within a few weeks the usage increased substantially and I soon found that the VM was nearing capacity. I had purposely utilized LVM just in case resizing became necessary.
There are multiple ways to accomplish this task and this is but one way that works for me and the Debian OS. I opted to add a new (second) virtual disk and then expand the LVM, but it is possible to increase the original disk size and then follow similar steps. While the utilities are the same, the process is different. Please take note.
Critical Note: A mistake with the following commands could render your Virtual Machine unusable. I take careful precautions when doing maintenance of this nature. Due to this system being a VM, I was able to make a clone prior to making any changes. A snap shot or copying the VM would also provide some protection.
My Victual Machine is running on OSX and VMware Fusion. The Fusion software varies slightly from other VMware products. I had to shutdown my VM to add the hard drive but I know in other VMware variants, that I've been able to add the disk on the fly.
Identifying the partition type
Confirm that the partition type is actually Linux LVM.
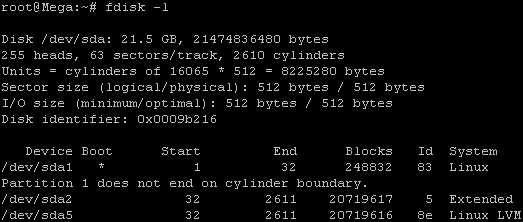
fdisk -l
/dev/sda5 is listed as Linux LVM and it has the ID of 8e. The 8e hex code shows that it is a Linux LVM, while 83 shows a Linux native partition.
Below is the disk information showing that our initial setup only has the one 20gb disk currently, which is under the logical volume named /dev/mapper/Mega-root – this is what we will be expanding with the new disk.
Note that /dev/mapper/Mega-root is the volume made up from /dev/sda5 currently – this is what we will be expanding.
Adding a new virtual hard disk
First add a new disk to the virtual machine. Be sure to match the drive type. Create the size disk that is needed for the increased capacity.
Detect the new disk space
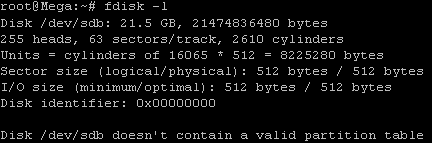
In my test for this example, as soon as I added the additional disk in through VMware it displayed through “fdisk -l” for me, you can see the second disk labelled /dev/sdb
If your system doesn't read the disk, you can run the following command to rescan. Change host0 depending on your setup.
echo "- - -" > /sys/class/scsi_host/host0/scan
Reboot if needed...Ultimately a reboot will make the partition visible.
Partition the new disk
We now need to partition the new /dev/sdb disk so that it can be used, this is done by using fdisk.
fdisk /dev/sdb
This should provide us with the below prompt, the inputs I have entered in are shown in bold.
‘n’ was selected for adding a new partition.
root@Mega:~# fdisk /dev/sdb
Command (m for help): n
‘p’ is then selected as we are making a primary partition.
Command action
   e   extended
   p   primary partition (1-4)
p
As this is a new disk, we do not yet have any partitions on it so we will use partition 1 here.
Partition number (1-4): 1
Next we press the enter key twice, as by default the first and last cylinders of the unallocated space should be correct.
First cylinder (1-2610, default 1): "enter"
Using default value 1
Last cylinder, +cylinders or +size{K,M,G} (1-2610, default 2610): "enter"
Using default value 2610
‘t’ is selected to change to a partitions system ID, in this case we change to ’1′ automatically as this is currently our only partition.
Command (m for help): t
Selected partition 1
The hex code ’8e’ was entered as this is the code for a Linux LVM which is what we want this partition to be, as we will be joining it with the original Linux LVM which is currently using /dev/sda5.
Hex code (type L to list codes): 8e
Changed system type of partition 1 to 8e (Linux LVM)
‘w’ is used to write the table to disk and exit, all changes that have been done will be saved and then you will be exited from fdisk.
Command (m for help): w
The partition table has been altered!

Calling ioctl() to re-read partition table.
Syncing disks.
By using “fdisk -l” now you will be able to see that /dev/sdb1 is listed, this is the new partition created on our newly added /dev/sdb disk and it is currently using all 20gb of space.

Increasing the logical volume
Next we will use the pvcreate command to create a physical volume for later use by the LVM. In this case the physical volume will be our new /dev/sdb1 partition.
root@Mega:~# pvcreate /dev/sdb1
  Physical volume "/dev/sdb1" successfully created
Now we need to confirm the name of the current volume group using the vgdisplay command. The name will vary depending on your setup, for me it is the name of my test server. vgdisplay provides plenty of information on the volume group, I have only shown the name and the current size of it for this example.
root@Mega:~# vgdisplay
  --- Volume group ---
  VG Name               Mega
  VG Size               19.76 GiB
Now using the vgextend command, we extend the ‘Mega’ volume group by adding in the physical volume of /dev/sdb1 which we created using the pvcreate command just before.
root@Mega:~# vgextend Mega /dev/sdb1
  Volume group "Mega" successfully extended
Using the pvscan command we scan all disks for physical volumes, this should confirm the original /dev/sda5 partition and the newly created physical volume /dev/sdb1
root@Mega:~# pvscan
  PV /dev/sda5   VG Mega   lvm2 [19.76 GiB / 0    free]
  PV /dev/sdb1   VG Mega   lvm2 [19.99 GiB / 19.99 GiB free]
  Total: 2 [39.75 GiB] / in use: 2 [39.75 GiB] / in no VG: 0 [0   ]
Next we need to increase the logical volume with the lvextend command (rather than the physical volume which we have already done). This means we will be taking our original logical volume and extending it over our new disk/partition/physical volume of /dev/sdb1.
Firstly confirm the name of the logical volume using lvdisplay. The name will vary depending on your setup.
root@Mega:~# lvdisplay
  --- Logical volume ---
  LV Path                /dev/Mega/root
  LV Size                18.91 GiB
The logical volume is then extended using the lvextend command. We are extending the original logical volume of /dev/Mega/root over the newer /dev/sdb1
root@Mega:~# lvextend /dev/Mega/root /dev/sdb1
  Extending logical volume root to 38.90 GiB
  Logical volume root successfully resized
If you like you can then run vgdisplay and lvdisplay again to confirm the size of the volume group and logical volume respectively, I have done this and I now have the following.
  LV Size                38.90 GiB
  VG Size                39.75 GiB
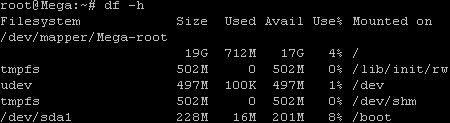
However if you run a “df” command to see available disk space it will not have changed yet as there is one final step, we need to resize the file system using the resize2fs command in order to make use of this space.
root@Mega:~# resize2fs /dev/Mega/root
resize2fs 1.41.12 (17-May-2010)
Filesystem at /dev/Mega/root is mounted on /; on-line resizing required
old desc_blocks = 2, new_desc_blocks = 3
Performing an on-line resize of /dev/Mega/root to 10196992 (4k) blocks.
The filesystem on /dev/Mega/root is now 10196992 blocks long.
Alternatively if you’re running the XFS file system (default as of RedHat/CentOS 7) you can grow the file system with “xfs_growfs /dev/Mega/root”.
Rather than resizing the file system manually, you could instead use the -r option of the lvextend command which will automatically resize the file system to make use of the additional disk space.
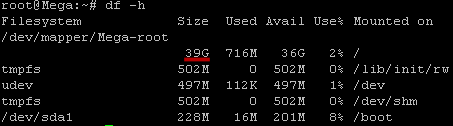
The resize took a minute or so to complete (it will depend on the disk speed and size), running the “df” command now shows the correct disk space for /dev/mapper/Mega-root